SQL: INSERT INTO TABLE
In the previous article, we’ve created tables, and now we’re ready to use the SQL INSERT INTO TABLE command and populate these tables with data. To do so, We’ll also check the contents of both tables before and after these commands using the SELECT statement. So, let’s start.
INSERT INTO TABLE statement
There is no point in creating database structures and not having any data in the database. The INSERT INTO TABLE statement is the one we’ll use to solve this problem. It is one of the four important SQL DML (Data Manipulation Language) statements SELECT … FROM, INSERT INTO TABLE, UPDATE … SET, and DELETE FROM… The complete syntax is pretty complex since the INSERT INTO could also be a very complex statement.
In this article we’ll use simplified, but also most common syntax:
INSERT INTO table_name (column_list) VALUES (column_values);
In such an INSERT INTO statement, you’ll need to define the table_name where you’re inserting data, list all columns (maybe you’ll use all of them, but maybe only a few of them), and then list all values. Notice that column values should match column types definition (e.g., you can’t insert a textual value into the numerical column/attribute).
In case you’re inserting all values in the table, you don’t need to list all columns after the table_name and you could use even more simplified syntax:
INSERT INTO table_name VALUES (column_values);
I personally prefer listing all column names, because this approach would work even if we add new columns to the existing table.
The simplified syntax for one such case where INSERT and SELECT statements are combined is given below:
INSERT INTO destination_table (column_list, …)
SELECT column_list
FROM source_table
WHERE condition;
INSERT INTO TABLE
To check the contents of these two tables, we’ll use two simple SELECT statements:
1 2 | SELECT * FROM medicine; SELECT * FROM cashier; |
While SELECT is not the topic of this article, it should be mentioned that its’ basic syntax is:
SELECT 1 or more attributes FROM table;
The star (*) after SELECT represents that we want to show the values of all attributes/columns from that table in the query result.
As expected, there is nothing in these two tables, and SQL Server returns the result, as shown in the picture below. Statements return names of the columns from the tables we used in the SELECT query, but there is nothing under these column names. You can look at this as an empty Excel sheet with defined column names (headers). You know what type of data should be there, but there is nothing:
.png)
.png)
.png)
Now, we’ll need to change that.
First, we’ll populate the cashier table using the following INSERT INTO TABLE statements:
1 2 3 4 5 | insert into cashier values
(001, "Amara", "0774216531", "41,Robert Road Dehiwala"),
(002, "Dasun", "0713489022", "10,peris Avenue Macashierradana"),
(003, "Nadun", "077128904", "1,Lake Road Kandy"),
(004, "Kalani", "0773484561", "52,perera Road Kalaniya"),
(005, "Aruni" , "0712386523" , "101,Galle Road Kurunagalla" ); |
Data for five countries were successfully inserted. The result is shown in the picture below. Since we had 5 INSERT INTO TABLE statements we have 1 “(1 row affected)” message for each of these five commands in the “Messages” section:
.png)
.png)
Please note that all values (after VALUES) were ordered in the same manner in which we listed columns (after INSERT INTO cashier). All three values are texts. The query would work even if we haven’t ordered them in the right manner because all of them have the same data type (text), but the data would be stored in the wrong columns. In that case, we would have a semantic error.
The next thing we need to do is to populate the Medicine table. We’ll do that using the following statements:
After executing these statements, this was the result. As expected, 6 rows were added. And once more we have 1 message for each insert in the Messages section:
.png)
.png)
In this case, we would have a problem if we haven’t listed values in the same manner, we listed columns because their data types are not the same (they are – in order: text, decimal number, decimal number, integer). This type of error is called syntax error and the DBMS itself would prevent the query from running at all.
SELECT – Check what was inserted
Now we’ll once more check what is stored in our tables. We’ll use the same two SELECT statements we have used previously:
1 2 | SELECT * FROM cashier; SELECT * FROM medicine; |
The result is shown in the picture below. Please notice that after executing queries now we have Results and Messages sections under queries:
.png)
.png)
SELECT column1, column2, FROM table_name; |
Here, column1, column2, ... are the field names of the table you want to select data from. If you want to select all the fields available in the table, use the following syntax:
SELECT * FROM table_name;
Examples:
.png)
.png)
.png)
.png) |
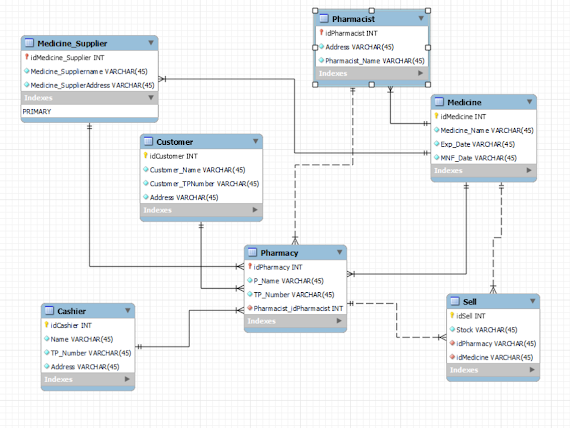
| pharmacist Table |
.png) |
| Medicine Table |
.png) |
| Pharmacy Table |
The SQL UPDATE statement is another common task used by data engineers and database administrators. Use it to change a column value for one or multiple rows.
Here's how an SQL UPDATE statement is generally structured:
UPDATE tableNameSET column1=value1, column2=value2,...WHERE filterColumn=filterValue |
Just like with the SQL INSERT statement, first, we need to identify the table we're wanting to update. Then we use the SET clause which details the columns we want to update. Finally, we use the WHERE clause to pinpoint which rows we want to include in the update.
Here's an example using our case study. Our pharmacy department was to change the name of the cashier, so its name needs to be changed in the database. To update this name, you could execute this statement:
SELECT * FROM pharmacy.cashier; Update cashier SET Name='rattit' WHERE Cashier_cashierId=5; |
.png)
.png)
.png)
DELETE is the diaper change of the SQL world. Is there something you don't want in there? Delete it!DELETE removes one or multiple rows from a table, but be careful! You need to make sure you know what you're deleting before you go ahead and commit to the statement!
Here's what your average SQL DELETE statement looks like:
DELETE tableNameWHERE filterColumn=filterValue; |
It's just two parts: specifying the table and specifying WHERE—which rows you want to delete.
If you know the primary key of a row you want to delete, your job is simple. Do you want to delete the Lincoln Ward from your table? It's just:
DELETE FROM cashierWHERE Cashier_cashierId=1; |
.png)
.png)
.png)
Conclusion
Once you've mastered the SQL Basics, then SQL INSERT, UPDATE, and DELETE statements are your next step to database glory! If this article has to whet your appetite to learn more, check out our beginner-friendly course, How Insert, Select, Update, Delete.
So, what are you waiting for? INSERT some new knowledge into your life now, UPDATE your SQL education, and DELETE all those excuses! We'll see you around the databases.
.png)

Comments
Post a Comment